The Crimson Castle Crusher: Difference between revisions
Jump to navigation
Jump to search
Beepboop8-3 (talk | contribs) (→Drop Table: (incomplete, but lists the 14*s at least)) |
Beepboop8-3 (talk | contribs) (→Drop Table: added UH & SSA drops) |
||
| (2 intermediate revisions by one other user not shown) | |||
| Line 22: | Line 22: | ||
! Quest Time Limit | ! Quest Time Limit | ||
| 60:00 | | 60:00 | ||
|- | |||
! Damage Limit | |||
| 999,999 | |||
|} | |} | ||
| Line 27: | Line 30: | ||
* This Quest may only be cleared once per instance. | * This Quest may only be cleared once per instance. | ||
* The player's Main and Sub Class must be Level 75 or higher to access Extra Hard difficulty. | * The player's Main and Sub Class must be Level 75 or higher to access Extra Hard difficulty. | ||
==Enemies== | ==Enemies== | ||
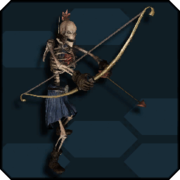
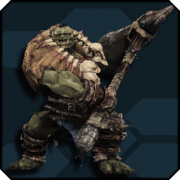
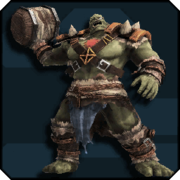
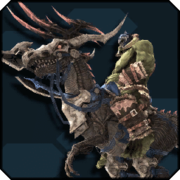
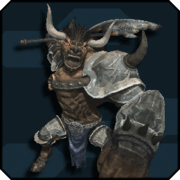
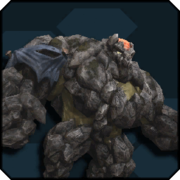
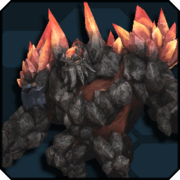
<gallery mode="packed" caption="Demons"> | |||
File:UIEnemyOmegaGoblin.png|link=Omega Goblin|[[Omega Goblin]] | |||
File:UIEnemyGoblinBomber.png|link=Goblin Bomber|[[Goblin Bomber]] | |||
File:UIEnemySkullArcher.png|link=Skull Archer|[[Skull Archer]] | |||
File:UIEnemyOmegaOrc.png|link=Omega Orc|[[Omega Orc]] | |||
File:UIEnemyOrcBomber.png|link=Orc Bomber|[[Orc Bomber]] | |||
File:UIEnemyOrcCavalier.png|link=Orc Cavalier|[[Orc Cavalier]] | |||
File:UIEnemyMinotaurgus.png|link=Minotaurgus|[[Minotaurgus]] | |||
File:UIEnemyRockGolem.png|link=Rock Golem|[[Rock Golem]] | |||
File:UIEnemyBomberGolem.png|link=Bomber Golem|[[Bomber Golem]] | |||
</gallery> | |||
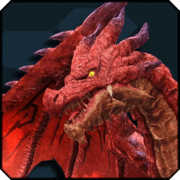
<gallery mode="packed" caption="Bosses"> | |||
File:UIEnemyErythronDragon.png|link=Erythron Dragon|[[Erythron Dragon]] | |||
</gallery> | |||
==Laconium Sword== | ==Laconium Sword== | ||
| Line 68: | Line 85: | ||
* {{rarity|12}} {{icons|Arm}} Arm / Evleda Ret | * {{rarity|12}} {{icons|Arm}} Arm / Evleda Ret | ||
* {{rarity|12}} {{icons|Leg}} Leg / Evleda Serb | * {{rarity|12}} {{icons|Leg}} Leg / Evleda Serb | ||
|rowspan="1"|XH | |rowspan="1"|XH+ | ||
* {{rarity|14}} {{icons|Partizan}} [[Gilde Girola]] | * {{rarity|14}} {{icons|Partizan}} [[Gilde Girola]] | ||
* {{rarity|14}} {{icons|Knuckles}} [[Gear Experience]] | * {{rarity|14}} {{icons|Knuckles}} [[Gear Experience]] | ||
| Line 78: | Line 95: | ||
* {{rarity|13}} Evleda Series | * {{rarity|13}} Evleda Series | ||
* {{rarity|10}} {{icons|Tool}} Conqueror's Crest | * {{rarity|10}} {{icons|Tool}} Conqueror's Crest | ||
* {{rarity|13}} {{icons|Egg}} Jinga | |||
* {{rarity|13}} {{icons|Egg}} Popple | |||
* {{rarity|13}} {{icons|Egg}} Aero | |||
* {{rarity|13}} {{icons|Egg}} Maron | |||
* {{rarity|13}} {{icons|Egg}} Melon | |||
* {{rarity|13}} {{icons|Egg}} Viola | |||
* {{rarity|13}} {{icons|Egg}} Synchro | |||
* {{rarity|13}} {{icons|Egg}} Redran | |||
* {{rarity|13}} {{icons|Egg}} Rappy | |||
* {{rarity|13}} {{icons|Candy}} Grand Parfait | |||
* {{rarity|13}} {{icons|Candy}} Noisy Parfait | |||
|rowspan="1"|UH | |||
* {{rarity|14}} {{icons|Takt}} [[Atlas Tahat]] | |||
* {{rarity|14}} {{icons|Material}} Time Reversal Stone Chronos | |||
|- rowspan="5" style="vertical-align:top; text-align:left;" | |||
| | |||
| | |||
| | |||
| | |||
| {{icons|S-Class Special Ability}} S-Class Special Abilities † | |||
* {{icons|SSA 1}} S1:Wise Skill | |||
* {{icons|SSA 1}} S1:Radiating Grace | |||
* {{icons|SSA 2}} S2:Flowing Exhilaration | |||
* {{icons|SSA 2}} S2:Photon Reduction | |||
* {{icons|SSA 3}} S3:Skilled Strike | |||
* {{icons|SSA 3}} S3:Radiant Strike | |||
| {{icons|S-Class Special Ability}} S-Class Special Abilities † | |||
* {{icons|SSA 1}} '''S1:Wise Skill 2''' | |||
* {{icons|SSA 1}} '''S1:Radiating Grace 2''' | |||
* {{icons|SSA 1}} S1:Offensive Intent | |||
* {{icons|SSA 1}} S1:Photon Reduction | |||
* {{icons|SSA 1}} S1:Brilliant Ruin | |||
* {{icons|SSA 1}} S1:Sturdy Intent | |||
* {{icons|SSA 1}} S1:Phantasmal Intent | |||
* {{icons|SSA 2}} '''S2:Flowing Exhilaration 2''' | |||
* {{icons|SSA 2}} '''S2:Photon Reduction 2''' | |||
* {{icons|SSA 2}} S2:Wise Skill | |||
* {{icons|SSA 2}} S2:Radiant Strike | |||
* {{icons|SSA 2}} S2:Guardian Armor | |||
* {{icons|SSA 2}} S2:Skilled Strike | |||
* {{icons|SSA 2}} S2:Rupturing Intent | |||
* {{icons|SSA 2}} S2:Phantasmal Radiance | |||
* {{icons|SSA 2}} S2:Phantasmal Gleam | |||
* {{icons|SSA 2}} S2:Phantasmal Guardian | |||
* {{icons|SSA 2}} S2:Instant Reduction | |||
* {{icons|SSA 2}} S2:Medicinal Wisdom | |||
* {{icons|SSA 3}} '''S3:Skilled Strike 2''' | |||
* {{icons|SSA 3}} '''S3:Radiant Strike 2''' | |||
* {{icons|SSA 3}} S3:Flowing Exhilaration | |||
* {{icons|SSA 3}} S3:Radiating Grace | |||
* {{icons|SSA 3}} S3:Guardian Armor | |||
* {{icons|SSA 3}} S3:Furious Inspiration | |||
* {{icons|SSA 3}} S3:Immediate Profusion | |||
* {{icons|SSA 3}} S3:Phantasmal Reduction | |||
|} | |} | ||
* † on {{rarity|13}} Val Series | |||
Latest revision as of 19:23, 22 May 2020
The Crimson Castle Crusher (壊城に舞う紅き邪竜) is an Emergency Quest.
Overview
| Quest Type | Emergency Quest |
|---|---|
| Quest Goal | Defeat the Erythron Dragon! |
| Single/Multi Party | Multi |
| Clearing Conditions | - |
| Failing Conditions | Time Limit Expires |
| Quest Time Limit | 60:00 |
| Damage Limit | 999,999 |
Quest Restrictions
- This Quest may only be cleared once per instance.
- The player's Main and Sub Class must be Level 75 or higher to access Extra Hard difficulty.
Enemies
- Demons


- Bosses
Laconium Sword
The Laconium Sword is a special mechanic that appears exclusively in The Crimson Castle Crusher. It is a replica of Alis Landale's signature weapon, and is the only weapon capable of defeating the Erython Dragon.
Mechanics
- Up to three Laconium Swords can appear on-stage until the end of the fight.
- While wielding the Laconium Sword, your HP and PP are preset to default amounts. You will not be incapacitated if you run out of HP while wielding the Laconium Sword.
- The Laconium Sword has a duration of 60 seconds. You will be forced to disarm early if your HP is depleted while using the Laconium Sword.
- Weapon Abilities:
- Attack: Slash with the Laconium Sword. Deals significant damage and fires a sword beam that inflicts additional damage.
- Buster Divide: Photon Art. Rapidly approach a locked-on target and slash with the Sword. Chargeable; upon full charge, player twirls the Sword and holds it in reverse grip; striking a blue weak spot with a fully charged Buster Divide breaks it instantly.
- Guard: Weapon Action. Ready the shield and create a barrier. Deflects incoming attacks and protects players behind the wielder. Otherwise exhibits similar properties to the Guard Weapon Action on Hunter Weapons.
Strategy
The Quest is divided into two parts.
Part 1
Leagues of Demons assault the party on the bridge to the citadel. ARKS must break through their forces to engage in direct combat with the Erythron Dragon.
- Defeat each wave of Demons to break the barrier. After four waves, a Catapult appears to progress to Part 2.
- The Erythron Dragon will constantly fly around the arena and shoot fireballs at players. Avoid the glowing markers on the ground to dodge the fireballs.
- The Erythron Dragon will occasionally land on the citadel and breathe fire in a column in front of him, dealing massive damage to any player it hits. Avoid the glowing column marker to dodge the fire.
Part 2
ARKS takes the fight to the Erythron Dragon, with the support of Alis Landale and the Laconium Sword.
- See Erythron Dragon for more details.
Drop Table
N+
|
H+ | VH+ | SH+
|
XH+
|
UH
|
|
|
- † on
 Val Series