Difference between revisions of "World Map (NGS)"
MoonRunestar (talk | contribs) (→Retem El-Nossa: correct numbers) |
MoonRunestar (talk | contribs) (→Retem: Add sublocations) |
||
| Line 183: | Line 183: | ||
|colspan="2"|'''Gathering''': {{NGSItem|Icon=NGS Mineral|PageName=Materials_(NGS)|RealName=Monotite}}, {{NGSItem|Icon=NGS Mineral|PageName=Materials_(NGS)|RealName=Photon Quartz}}, ???, ???, ???, ????, ???, ??? | |colspan="2"|'''Gathering''': {{NGSItem|Icon=NGS Mineral|PageName=Materials_(NGS)|RealName=Monotite}}, {{NGSItem|Icon=NGS Mineral|PageName=Materials_(NGS)|RealName=Photon Quartz}}, ???, ???, ???, ????, ???, ??? | ||
|- | |- | ||
| − | |colspan="2"|'''Sub-locations''': | + | |colspan="2"|'''Sub-locations''': Mt. Sagaan Road, Steckin Lowlands |
|} | |} | ||
| Line 199: | Line 199: | ||
|colspan="2"|'''Gathering''': {{NGSItem|Icon=NGS Mineral|PageName=Materials_(NGS)|RealName=Monotite}}, {{NGSItem|Icon=NGS Mineral|PageName=Materials_(NGS)|RealName=Dualomite}}, {{NGSItem|Icon=NGS Mineral|PageName=Materials_(NGS)|RealName=Trinite}}, {{NGSItem|Icon=NGS Mineral|PageName=Materials_(NGS)|RealName=Photon Chunk}}, ???, ???, ??? | |colspan="2"|'''Gathering''': {{NGSItem|Icon=NGS Mineral|PageName=Materials_(NGS)|RealName=Monotite}}, {{NGSItem|Icon=NGS Mineral|PageName=Materials_(NGS)|RealName=Dualomite}}, {{NGSItem|Icon=NGS Mineral|PageName=Materials_(NGS)|RealName=Trinite}}, {{NGSItem|Icon=NGS Mineral|PageName=Materials_(NGS)|RealName=Photon Chunk}}, ???, ???, ??? | ||
|- | |- | ||
| − | |colspan="2"|'''Sub-locations''': | + | |colspan="2"|'''Sub-locations''': Oasis, Daalsmarb Desert, Trinitis, Tiarm Coast |
|} | |} | ||
| Line 213: | Line 213: | ||
|colspan="2"|'''Gathering''': {{NGSItem|Icon=NGS Mineral|PageName=Materials_(NGS)|RealName=Photon Chunk}}, ???, ???, ???, ??? | |colspan="2"|'''Gathering''': {{NGSItem|Icon=NGS Mineral|PageName=Materials_(NGS)|RealName=Photon Chunk}}, ???, ???, ???, ??? | ||
|- | |- | ||
| − | |colspan="2"|'''Sub-locations''': | + | |colspan="2"|'''Sub-locations''': Morava Canyon, Kinraad Cape |
|} | |} | ||
| Line 227: | Line 227: | ||
|colspan="2"|'''Gathering''': {{NGSItem|Icon=NGS Mineral|PageName=Materials_(NGS)|RealName=Dualomite}}, {{NGSItem|Icon=NGS Mineral|PageName=Materials_(NGS)|RealName=Trinite}}, ???, ???, ???, ???, ??? | |colspan="2"|'''Gathering''': {{NGSItem|Icon=NGS Mineral|PageName=Materials_(NGS)|RealName=Dualomite}}, {{NGSItem|Icon=NGS Mineral|PageName=Materials_(NGS)|RealName=Trinite}}, ???, ???, ???, ???, ??? | ||
|- | |- | ||
| − | |colspan="2"|'''Sub-locations''': | + | |colspan="2"|'''Sub-locations''': Al-demmond Desert, Garneru Coast |
|} | |} | ||
==== Luf Maqaad ==== | ==== Luf Maqaad ==== | ||
{| class="wikitable" style=max-width:56em | {| class="wikitable" style=max-width:56em | ||
| − | !colspan="2"| | + | !colspan="2"|Luf Maqaad |
|- | |- | ||
|colspan="2"|[[File:NGSUISectionLufMaqaad.png|link=|center|class=img-fluid]] | |colspan="2"|[[File:NGSUISectionLufMaqaad.png|link=|center|class=img-fluid]] | ||
| Line 241: | Line 241: | ||
|colspan="2"|'''Gathering''': {{NGSItem|Icon=NGS Mineral|PageName=Materials_(NGS)|RealName=Photon Quartz}}, ???, ???, ???, ??? | |colspan="2"|'''Gathering''': {{NGSItem|Icon=NGS Mineral|PageName=Materials_(NGS)|RealName=Photon Quartz}}, ???, ???, ???, ??? | ||
|- | |- | ||
| − | |colspan="2"|'''Sub-locations''': | + | |colspan="2"|'''Sub-locations''': None |
|} | |} | ||
| Line 255: | Line 255: | ||
|style="width:50%;vertical-align:top"|{{Template:NGSSectorStats|Ryukers=1|Collectables=16|Datapods=3|Boxes=12}} | |style="width:50%;vertical-align:top"|{{Template:NGSSectorStats|Ryukers=1|Collectables=16|Datapods=3|Boxes=12}} | ||
|- | |- | ||
| − | |colspan="2"|'''Sub-locations''': | + | |colspan="2"|'''Sub-locations''': None |
|} | |} | ||
| Line 267: | Line 267: | ||
|style="width:50%;vertical-align:top"|{{Template:NGSSectorStats|Ryukers=1|Collectables=16|Datapods=1|Boxes=15}} | |style="width:50%;vertical-align:top"|{{Template:NGSSectorStats|Ryukers=1|Collectables=16|Datapods=1|Boxes=15}} | ||
|- | |- | ||
| − | |colspan="2"|'''Sub-locations''': | + | |colspan="2"|'''Sub-locations''': None |
|} | |} | ||
Revision as of 22:45, 17 December 2021
This page outlines what can be found at each location on Planet Halpha.
Using the World Map
The World Map in-game can be accessed in a few different ways. The Main Menu has a ![]() World Map button that shows the World Map, but you can also bring up the World map by tapping the [F10] key, or holding the [Esc] key or (Options) button on a controller. The World Map can also be accessed via a Ryuker Device, using the "Teleport" option.
World Map button that shows the World Map, but you can also bring up the World map by tapping the [F10] key, or holding the [Esc] key or (Options) button on a controller. The World Map can also be accessed via a Ryuker Device, using the "Teleport" option.
With the World Map open, use the following controls to navigate it.
- Move the mouse or move the left stick to move the cursor. Hold (L2) on a controller to move the cursor faster.
- When using the mouse, click and drag the map to pan it around.
- Press the [R] key or (Square) on a controller to place a Personal Guide marker on the map. This marker will appear on the minimap as well.
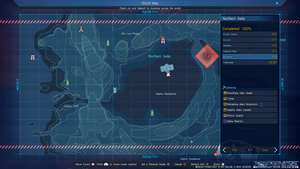
- Press the [Tab] key or (Triangle) on a controller to show Section Information, which includes the amount of discovered Ryuker Devices, Cocoons, Towers, Battledia, Gathering materials, and Collectables.
- Press the [G] key, use the scroll wheel, or press (R3) on a controller to zoom in and out of the map.
- Press the (R1) button to toggle visibility of map labels.
- Press the [Esc], [ [ ], [F10] keys or the (Options) button on a controller to close the World Map
Regions
This section has a list of all regions on planet Halpha, and the sectors within them. Below each sector name is details about them.
Aelio
Central City (セントラルシテイ)
| Central City (セントラルシテイ) |
|---|
 |
| Lobby Area (100 Players) |
The largest city on planet Halpha. This is the location you appear at when signing in, and you also return to this location after completing an Emergency Quest.
Central Aelio (中央エアリオ)
| Central Aelio (中央エアリオ) | |
|---|---|
 | |
Recommended Power Level: 800 Average Enemy Level: Lv.1 |
|
| Gathering: | |
| Sub-locations: Halpha Grasslands (ハルファナ平原), Mt. Mahina Pari (マヒナパリ山) | |
These are the fields found right outside of Central City's walls. With a temperate climate and easy-to-navigate terrain, this is the perfect place for new ARKS recruits to train their skills.
Urgent Quests
Western Aelio (西エアリオ)
| Western Aelio (西エアリオ) | |
|---|---|
 | |
Recommended Power Level: 933 Average Enemy Level: Lv.7 |
|
| Gathering: | |
| Sub-locations: Aelio Town Ruins | |
A sector that makes up the western border of Aelio. Aelio Town can be found here as well as steep cliffs and beaches.
Lake Halphiria (ハルフィリア湖)
| Lake Halphiria (ハルフィリア湖) | |
|---|---|
 | |
Recommended Power Level: 9999 Average Enemy Level: Lv.60 |
|
| Sub-locations: ? | |
A lake area where aggressive enemies normally do not appear.
Northern Aelio (北エアリオ)
| Northern Aelio (北エアリオ) | |
|---|---|
 | |
Recommended Power Level: 1045 Average Enemy Level: Lv.12 |
|
| Gathering: | |
| Sub-locations: Halpha Marshlands (ハルファナ湿原), Alto Lani Plateau (アルト・ラニ高原) | |
The marshlands found in this region feature a derelict facility built on top of them. Further north is Alto Lani Plateau, where it is said a special DOLL occasionally appears.
Urgent Quests
Southern Aelio (南エアリオ)
| Southern Aelio (南エアリオ) | |
|---|---|
 | |
Recommended Power Level: 835 Average Enemy Level: Lv.3 |
|
| Gathering: | |
| Sub-locations: Barflow Waterfall (パルフロウ大瀑布?/バルフロウ大瀑布?), Mt. Picott (ピコット山) | |
A region well-known for its waterfalls. A coastline can also be found to the south, as well as as a mountain named Mt. Picott to the south-east.
Mt. Magnus (マグナス山)
| Mt. Magnus (マグナス山) | |
|---|---|
 | |
Recommended Power Level: 894 Average Enemy Level: Lv.5 |
|
| Sub-locations: None | |
Mt. Magnus is a tall mountain found to the east of Central City. Updrafters can be found scattered throughout allowing you to easily traverse the terrain.
Vanford Laboratory Ruins (ヴァンフォード研究所跡)
| Vanford Laboratory Ruins (ヴァンフォード研究所跡) | |
|---|---|
 | |
Recommended Power Level: ? Average Enemy Level: Lv.10 |
|
| Sub-locations: None | |
The Vanford Laboratory Ruins are the remains of a Laboratory attacked by DOLLS. The once tall walls have been torn down by past battles.
Defeat the Dromes found throughout this sector to convert them to your side. Once on your side, they will attack nearby enemies.
Resol Forest (レゾルの森)
| Resol Forest (レゾルの森) | |
|---|---|
 | |
Recommended Power Level: 1184 Average Enemy Level: Lv.15 |
|
| Sub-locations: None | |
Resol Forest is a forest that changes its appearance at night. It is a dangerous combat sector, with powerful enemies confirmed to appear. As such, a high Power Level is required to enter.
Retem
Retem City
| Retem City |
|---|
 |
| Lobby Area (100 Players) |
The City of Retem found between Central Retem and Southern Retem.
Western Retem
| Western Retem | |
|---|---|
 | |
Recommended Power Level: 1223 Average Enemy Level: Lv.17 |
|
| Gathering: | |
| Sub-locations: Mt. Sagaan Road, Steckin Lowlands | |
The sector of Retem bordering on Aelio. It acts as a road to Central and Northern Aelio.
Central Retem
| Central Retem | |
|---|---|
 | |
Recommended Power Level: 1263 Average Enemy Level: Lv.19 |
|
| Gathering: | |
| Sub-locations: Oasis, Daalsmarb Desert, Trinitis, Tiarm Coast | |
Northern Retem
| Northern Retem | |
|---|---|
 | |
Recommended Power Level: 1396 Average Enemy Level: Lv.21 |
|
| Gathering: | |
| Sub-locations: Morava Canyon, Kinraad Cape | |
Southern Retem
| Southern Retem | |
|---|---|
 | |
Recommended Power Level: 1474 Average Enemy Level: Lv.23 |
|
| Gathering: | |
| Sub-locations: Al-demmond Desert, Garneru Coast | |
Luf Maqaad
| Luf Maqaad | |
|---|---|
 | |
Recommended Power Level: 1513 Average Enemy Level: Lv.24 |
|
| Gathering: | |
| Sub-locations: None | |
Luf Maqaad is a tall vertically orentated gathering area. Use the Updrafters to reach the top to find the entrance to Lower Maqaad.
Retem El-Nossa
| Retem El-Nossa | |
|---|---|
 | |
Recommended Power Level: 1363/1633 Average Enemy Level: Lv.20/Lv.30 |
|
| Sub-locations: None | |
Lower Maqaad
| Lower Maqaad | |
|---|---|
 | |
Recommended Power Level: 1562/1633 Average Enemy Level: Lv.25/Lv.30 |
|
| Sub-locations: None | |
Found below Luf Maqaad, Lower Maqaad houses a facility clad in metal and tubes, abandoned by its last residents.
Section Info
Ryuker Devices
Ryuker Devices, represented on the World Map as green icons (![]() ), can be used for several purposes, including fast travel, changing Blocks, accessing your Storage remotely, creating Quick Food, and moving to different rooms within Blocks.
), can be used for several purposes, including fast travel, changing Blocks, accessing your Storage remotely, creating Quick Food, and moving to different rooms within Blocks.
To be able to use a Ryuker Device, you must activate it first by physically visiting it. Inactive Ryuker Devices glow yellow, while activated Ryuker Devices glow blue.
By interacting with a Ryuker Device, or by opening your World Map, you can teleport to any activated Ryuker Device. Highlight the icon for the Ryuker Device you want to teleport to, then hold the confirm button down for a few seconds to start the teleport.
Cocoons
Battledia
Regional Mag
Gathering
Collectables
Item Containers
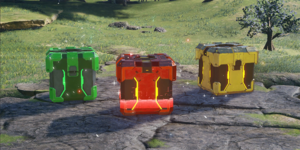
There are three types of Item Containers in the field: Green, Red, and Gold. Attack Item Containers to break them and reveal the items.
Green Containers contain ![]() N-Grinders.
N-Grinders.
Gold Containers are rare versions of Green Containers that can potentially spawn in the place of a Green Container. They usually contain ![]() Photon Quartz, but can rarely contain a
Photon Quartz, but can rarely contain a ![]() Alpha Reactor.
Alpha Reactor.
Red Containers can contain either 10,000 ![]() , 10
, 10 ![]() , or
, or ![]() Note Abilities. Certain Red Containers contain exclusive items, like the
Note Abilities. Certain Red Containers contain exclusive items, like the ![]() Quarde Armor Alga,
Quarde Armor Alga, ![]() Quarde Armor Belta, and
Quarde Armor Belta, and ![]() Quarde Armor Tseza units.
Quarde Armor Tseza units.
The number of red containers that appear per account is limited, meaning that once a red container is destroyed on one character, it is destroyed for all characters on the account. In addition, some Red Containers are protected by a barrier, and the container cannot be destroyed without destroying the devices that are creating the barrier.


