Difference between revisions of "User:Kenji Sayuda"
| (89 intermediate revisions by the same user not shown) | |||
| Line 7: | Line 7: | ||
|- | |- | ||
<!--Rarity-->|align=center|{{Rarity|15}} | <!--Rarity-->|align=center|{{Rarity|15}} | ||
| − | <!--Icon-->|align=center|{{NUI|UIClassAll}} | + | <!--Icon-->|align=center|[[File:UIItemCrest.png|64px|link=]]<br>{{NUI|UIClassAll}} |
<!--Name-->|Jared Dejicai<br>Kenji Sayuda | <!--Name-->|Jared Dejicai<br>Kenji Sayuda | ||
| − | <!--Description-->| | + | <!--Description-->|A person who weaves the world of Lu Shou,<br>tells the lives of those there & documents their pasts,<br>forever unraveling its future through the mind.<br><br>One who decided to work on the Visiphone due to its lack of<br>information despite the lack of time they already had. |
| − | <!--Notes-->|Played PSU 360 2yrs, Edited drop tables on PSUPedia as well.<br>Current PSO2 title count: 1, | + | <!--Notes-->|Played PSU 360 2yrs, PSO2 8yrs.<br>Edited drop tables on PSUPedia as well.<br>Current PSO2 title count: 1,731. |
|- | |- | ||
|} | |} | ||
| Line 16: | Line 16: | ||
[[User:Jared_Dejicai|Main Profile]] | [[User:Jared_Dejicai|Main Profile]] | ||
| − | {| class="wikitable | + | =working section= |
| − | ! | + | ==Kvaris Dolls== |
| + | {| class="wikitable sortable" | ||
| + | |+ | ||
| + | !Enemy | ||
| + | !Drop List | ||
| + | !Weakness | ||
| + | !Breakables | ||
| + | !Notes | ||
|- | |- | ||
| − | + | |style="text-align:center;"|[[File:NGSUIEnemySnowFuwan.png|128px|link=]]<br>Snow Fuwan<br>スノウフワン | |
| − | + | | | |
| + | | Weak to: | ||
| + | *{{icons|NGS Fire}} | ||
| + | | - | ||
| + | |A small floating enemy similar to a Dahgash that can fire long ranged attacks. | ||
|- | |- | ||
| − | + | |style="text-align:center;"|[[File:NGSUIEnemySnowTinos.png|128px|link=]]<br>Snow Tinos<br>スノウティノス | |
| − | + | | | |
| + | | Weak to: | ||
| + | *{{icons|NGS Fire}} | ||
| + | |||
| + | * | ||
| + | | - | ||
| + | |A small biped enemy similar to the Dwarf Gekko that consists of a small sphere with two legs attached. | ||
|- | |- | ||
| − | + | |style="text-align:center;"|[[File:NGSUIEnemyZamusSword.png|128px|link=]]<br>Zamus Sword<br> | |
| − | + | | | |
| + | |Weak to: | ||
| + | *{{icons|NGS Fire}} | ||
| + | Weak Point: | ||
| + | |||
| + | * Exposed Chest Core | ||
| + | |Breakables: | ||
| + | |||
| + | * Chestplate | ||
| + | |A humanoid DOLL with a bladed arm. Uses its flexible physiology to launch its sword arm, striking enemies from afar. Destroying its chestplate exposes a Chest Core weak point. | ||
|- | |- | ||
| − | + | |style="text-align:center;"|[[File:NGSUIEnemyZamusSlash.png|128px|link=]]<br>Zamus Slash<br> | |
| − | + | | | |
| + | |Weak to: | ||
| + | *{{icons|NGS Fire}} | ||
| + | |||
| + | * | ||
| + | Weak Point: | ||
| + | |||
| + | * Exposed Chest Core | ||
| + | |Breakables: | ||
| + | |||
| + | * Chestplate | ||
| + | | Destroying its chestplate exposes a Chest Core weak point. | ||
|- | |- | ||
| − | + | |style="text-align:center;"|[[File:NGSUIEnemyZamusGun.png|128px|link=]]<br>Zamus Gun<br> | |
| − | + | | | |
| + | |Weak to: | ||
| + | *{{icons|NGS Fire}} | ||
| + | |||
| + | * | ||
| + | Weak Point: | ||
| + | |||
| + | * Exposed Chest Core | ||
| + | |Breakables: | ||
| + | |||
| + | * Chestplate | ||
| + | |A humanoid DOLL with an energy gun for an arm. Destroying its chestplate exposes a Chest Core weak point. | ||
|- | |- | ||
| − | + | |style="text-align:center;"|[[File:NGSUIEnemyZamusLauncher.png|128px|link=]]<br>Zamus Launcher<br> | |
| − | + | | | |
| + | |Weak to: | ||
| + | *{{icons|NGS Fire}} | ||
| + | |||
| + | * | ||
| + | Weak Point: | ||
| + | |||
| + | * Exposed Chest Core | ||
| + | |Breakables: | ||
| + | |||
| + | * Chestplate | ||
| + | |A humanoid DOLL with an energy cannon for an arm. Destroying its chestplate exposes a Chest Core weak point. | ||
|- | |- | ||
| − | + | |style="text-align:center;"|[[File:NGSUIEnemyVolzamusSword.png|128px|link=]]<br>Volzamus Sword<br> | |
| − | + | | | |
| − | | | + | |Weak to: |
| − | + | *{{icons|NGS Fire}} | |
| − | + | Weak Point: | |
| − | + | ||
| − | + | * Exposed Chest Core | |
| − | + | |Breakables: | |
| − | + | ||
| − | + | * Chestplate | |
| − | + | |A humanoid DOLL with a bladed arm. Uses its flexible physiology to launch its sword arm, striking enemies from afar. Destroying its chestplate exposes a Chest Core weak point. | |
| − | | | ||
| − | |||
| − | |||
| − | |||
| − | |||
| − | |||
| − | |||
| − | |||
| − | |||
| − | |||
| − | |||
| − | |||
| − | |||
| − | |||
| − | |||
|- | |- | ||
| − | + | |style="text-align:center;"|[[File:NGSUIEnemyVolzamusGun.png|128px|link=]]<br>Volzamus Gun<br> | |
| − | + | | | |
| − | + | |Weak to: | |
| − | + | *{{icons|NGS Fire}} | |
| + | * | ||
| + | Weak Point: | ||
| + | * Exposed Chest Core | ||
| + | |Breakables: | ||
| − | + | * Chestplate | |
| − | + | |A humanoid DOLL with an energy gun for an arm. Destroying its chestplate exposes a Chest Core weak point. | |
|- | |- | ||
| − | + | |style="text-align:center;"|[[File:NGSUIEnemyJungues.png|128px|link=]]<br>Jungues<br> | |
| − | + | | | |
| + | |Weak to: | ||
| + | *{{icons|NGS Fire}} | ||
| + | Weak Point: | ||
| + | |||
| + | * | ||
| + | |Breakables: | ||
| + | |||
| + | * | ||
| + | | | ||
|- | |- | ||
| − | + | |style="text-align:center;"|[[File:NGSUIEnemyRinshan.png|128px|link=]]<br>Rinshan<br> | |
| − | + | | | |
| + | |Weak to: | ||
| + | *{{icons|NGS Fire}} | ||
| + | Weak Point: | ||
| + | |||
| + | * | ||
| + | |Breakables: | ||
| + | |||
| + | * | ||
| + | | | ||
|- | |- | ||
| − | + | |style="text-align:center;"|[[File:NGSUIEnemySnowRoron.png|128px|link=]]<br>Snow Roron<br> | |
| − | + | | | |
| + | |Weak to: | ||
| + | *{{icons|NGS Fire}} | ||
| + | Weak Point: | ||
| + | |||
| + | * Exposed Belly Core, Rear | ||
| + | |Breakables: | ||
| + | |||
| + | * Belly | ||
| + | | | ||
|- | |- | ||
| − | + | |style="text-align:center;"|[[File:NGSUIEnemySandRorox.png|128px|link=]]<br>Sand Rorox<br>サンドロロクス | |
| − | + | | | |
| + | |Weak to: | ||
| + | *{{icons|NGS Wind}} | ||
| + | Weak Point: | ||
| + | |||
| + | * Exposed Belly Core, Rear | ||
| + | |Breakables: | ||
| + | |||
| + | * Belly | ||
| + | | | ||
|- | |- | ||
| − | + | |style="text-align:center;"|[[File:NGSUIEnemyFritts.png|128px|link=]]<br>Fritts<br> | |
| − | + | | | |
| + | |Weak to: | ||
| + | *{{icons|NGS Fire}} | ||
| + | Weak Point: | ||
| + | |||
| + | * Hump Core | ||
| + | | - | ||
| + | |A towering quadruped DOLL similar to a Kartargot which uses its great height to fire beams at its enemies from any distance. Most vulnerable from the back, where its core can be found. | ||
|- | |- | ||
| − | + | |style="text-align:center;"|[[File:NGSUIEnemyProctusAel.png|128px|link=]]<br>Proctus Ael<br> | |
| − | + | | | |
| + | |Weak to: | ||
| + | *{{icons|NGS Fire}} | ||
| + | Weak Point: | ||
| + | |||
| + | * | ||
| + | | Breakables: | ||
| + | |||
| + | * Projector on back | ||
| + | | | ||
|- | |- | ||
| − | + | |style="text-align:center;"|[[File:NGSUIEnemyProctusRetena.png|128px|link=]]<br>Proctus Retena<br> | |
| − | + | | | |
| + | |Weak to: | ||
| + | *{{icons|NGS Fire}} | ||
| + | Weak Point: | ||
| + | |||
| + | * | ||
| + | |Breakables: | ||
| + | |||
| + | * Projector on back | ||
| + | | | ||
|- | |- | ||
| − | + | |style="text-align:center;"|[[File:NGSUIEnemySandNagrus.png|128px|link=]]<br>Sand Nagrus<br>サンドナグルス | |
| − | + | | | |
| + | |Weak to: | ||
| + | *{{icons|NGS Wind}} | ||
| + | Weak Point: | ||
| + | |||
| + | * Exposed Head Core | ||
| + | | - | ||
| + | |A large, quadruped beast-like DOLL that specializes in vicious close-ranged combat. Repeatedly striking it with Wind Techniques causes it get stunned. Initially, it has no weakpoints, but when enraged, it retracts its head and exposes a head core. | ||
|- | |- | ||
| − | + | |style="text-align:center;"|[[File:NGSUIEnemyIkusaBujin.png|128px|link=]]<br>Ikusa Bujin<br>イクサブジン | |
| − | + | | | |
| + | |Weak to: | ||
| + | *{{icons|NGS Wind}} | ||
| + | Weak Point: | ||
| + | |||
| + | * None/Geometric labyrinth | ||
| + | | - | ||
| + | |A mid-sized samurai like DOLL that aggressively attacks one handed using its katana. Unlike most boss DOLLS, Bujins do not have parts to break, but they can be frozen in place, as well as stagger Downed to increase damage to it. | ||
|- | |- | ||
| − | + | |style="text-align:center;"|[[File:NGSUIEnemyLysentos.png|128px|link=]]<br>Lysentos<br>リゼントス | |
| − | + | | | |
| + | |Weak to: | ||
| + | *{{icons|NGS Wind}} | ||
| + | |||
| + | * | ||
| + | Weak Point: | ||
| + | |||
| + | * Back Core | ||
| + | |Breakables: | ||
| + | | | ||
|- | |- | ||
| − | + | |style="text-align:center;"|[[File:NGSUIEnemyKelkund.png|128px|link=]]<br>Kelkund<br>ケルクンド | |
| − | + | | | |
| + | |Weak to: | ||
| + | *{{icons|NGS Wind}} | ||
| + | Weak Point: | ||
| + | |||
| + | * None | ||
| + | | - | ||
| + | | | ||
|- | |- | ||
| − | + | |style="text-align:center;"|[[File:NGSUIEnemyFortesLaser.png|128px|link=]]<br>Fortes Laser<br>フォートス・レーザー | |
| − | + | | | |
| + | |Weak to: | ||
| + | |||
| + | *{{icons|NGS Wind}} | ||
| + | |||
| + | * | ||
| + | Weak Point: | ||
| + | |||
| + | * | ||
| + | |Breakables: | ||
| + | | | ||
|- | |- | ||
| − | + | |style="text-align:center;"|[[File:NGSUIEnemyFortesLauncher.png|128px|link=]]<br>Fortes Launcher<br>フォートス・ランチャー | |
| − | + | | | |
| + | |Weak to: | ||
| + | |||
| + | *{{icons|NGS Wind}} | ||
| + | |||
| + | * | ||
| + | Weak Point: | ||
| + | |||
| + | * | ||
| + | |||
| + | |Breakables: | ||
| + | | | ||
|- | |- | ||
| − | + | |style="text-align:center;"|[[File:NGSUIEnemyLenusRetem.png|128px|link=]]<br>Lenus Retem<br>レヌス・リテム | |
| − | + | | | |
| + | |Weak to: | ||
| + | |||
| + | *{{icons|NGS Wind}} | ||
| + | |||
| + | * | ||
| + | Weak Point: | ||
| + | |||
| + | * | ||
| + | |||
| + | Physical Down Point: | ||
| + | |||
| + | * | ||
| + | | - | ||
| + | | | ||
|- | |- | ||
| − | + | |style="text-align:center;"|[[File:NGSUIEnemyLenusVera.png|128px|link=]]<br>Lenus Vera<br>レヌス・ヴェラ | |
| − | + | | | |
| + | |Weak to: | ||
| + | |||
| + | *{{icons|NGS Dark}} | ||
| + | |||
| + | * | ||
| + | Weak Point: | ||
| + | |||
| + | * | ||
| + | |||
| + | * | ||
| + | | - | ||
| + | | | ||
|- | |- | ||
| − | + | |style="text-align:center;"|[[File:NGSUIEnemySnidaelHammer.png|128px|link=]]<br>Snidael Hammer<br>スナイダル・ハンマー | |
| − | + | | | |
| + | |Weak to: | ||
| + | |||
| + | *{{icons|NGS Wind}} | ||
| + | Weak Point: | ||
| + | |||
| + | * | ||
| + | |||
| + | Physical Down Point: | ||
| + | |||
| + | * | ||
| + | |Breakables: | ||
| + | |||
| + | * | ||
| + | * | ||
| + | | | ||
|- | |- | ||
| − | + | |style="text-align:center;"|[[File:NGSUIEnemySnidaelVera.png|128px|link=]]<br>Snidael Vera<br>スナイダル・ヴェラ | |
| − | + | | | |
| − | + | |Weak to: | |
| − | + | ||
| − | + | *{{icons|NGS Dark}} | |
| − | + | Weak Point: | |
| − | + | ||
| − | + | * | |
| + | |||
| + | Physical Down Point: | ||
| + | |||
| + | * | ||
| + | |Breakables: | ||
| + | |||
| + | * | ||
| + | * | ||
| + | | | ||
|- | |- | ||
| + | |} | ||
| + | |||
| + | |||
| + | |||
| + | =working section 2= | ||
| + | == Las Vegas == | ||
| + | {{EnemyHeader}} | ||
| + | |||
| + | {{EnemyRow|boxerphamut|[[File:BoxerPhantomIcon.png|128px]]|Boxer Phamut|ボクサーファムト|Las Vegas<br>[[Riding Quest]]||{{icons|Wind}}||???|Melee attacks the player.}} | ||
| + | |||
| + | {{EnemyRow|vulturephamut|[[File:VulturePhantomIcon.png|128px]]|Vulture Phamut|バルチャファムト|Las Vegas<br>[[Riding Quest]]||{{icons|Wind}}|Head|???|Tries to grab the player if caught every Vulture Phantom will attack the player.}} | ||
| + | |||
| + | {{EnemyRow|jugglerpierrot|[[File:JugglerClownIcon.png|128px]]|Juggler Pierrot|ジャグラーピエロ|Las Vegas<br>[[Riding Quest]]||{{icons|Wind}}|Head||Tosses swords at player, gets on a ball and tries to run over the player.}} | ||
| + | |||
| + | {{EnemyRow|chainsawpierrot|[[File:ChainsawClownIcon.png|128px]]|Chainsaw Pierrot|チェーンソーピエロ|Las Vegas<br>[[Riding Quest]]||{{icons|Wind}}|Head||Attacks with melee and makes and let go ballons.}} | ||
| + | |||
| + | {{EnemyRow|circuscarriage|[[File:CircusCarriageIcon.png|128px]]|Circus Carriage|サーカスキャリッジ|Las Vegas<br>[[Riding Quest]]||{{icons|Wind}}|Driver<br>Blue Sigil||Attack by charging at the player, shooting fire balls in the air, throw rings of fire at the player, sucking the player in so they can be shot far away.}} | ||
| + | |||
| + | {{EnemyRow|brownbear|[[File:BrownBear.png|128px]]|Brown Bear|ブラウンベア|Tokyo<br>[[Riding Quest]]||{{icons|Wind}}|Blue Sigil<br>Head||Melee attacks the player and does a special attack that make a bear head pop up and charges at the player. If the player does enough damage to the head during the use the skill stop and the bear fall over making the weakpoint appear.}} | ||
| + | |||
| + | {{EnemyRow|polarbear|[[File:PolarBear.png|128px]]|Polar Bear|ポーラーベア|Tokyo<br>[[Riding Quest]]||{{icons|Wind}}|Blue Sigil||Melee attacks the player and does a special attack that makes bear arms pop up and shoots a ball of energy at the player. If the player does enough damage to the head during the use the skill stop and the bear fall over making the weakpoint appear.}} | ||
| + | |||
| + | {{EnemyRow|trex|[[File:T.Rex.png|128px]]|T. Rex|T・レックス|Tokyo<br>[[Riding Quest]]||{{icons|Wind}}|Blue Sigil<br>Head|Tail|Attacks the player with melee attacks and has a skill that makes a T. Rex skull pop out of its chest that shoots a laser beam, during this its weakpoint is exposed. If the player break the Tail it lose a melee attack}} | ||
| + | |||
| + | {{EnemyRow|rexnoir|[[File:RexNoir.png|128px]]|Rex Noir|レックスノワール|Tokyo<br>[[Riding Quest]]||{{icons|Wind}}|Blue Sigil<br>Head|Tail|Rare version of T. Rex does more damage and has more health.}} | ||
| + | |||
| + | {{EnemyRow|roadroller|[[File:RoadRoller.png|128px]]|Road Roller|ロードローラー|Tokyo<br>[[Riding Quest]]||{{icons|Wind}}|Blue Sigil||It attacks the player by charging at them. It also can spin its wheel causing gravel to appear hurting anyone near it. It can also flip a big slab of concrete at the player.}} | ||
| + | |||
| + | {{EnemyRow|redroller|[[File:RedRoller.png|128px]]|Red Roller|レッドローラー|Tokyo<br>[[Riding Quest]]||{{icons|Wind}}|Blue Sigil||Rare version of Road Roller does more damage and has more health.}} | ||
| + | |||
| + | {{EnemyRow|snakeheli|[[File:SnakeHelicopter.png|128px]]|Snake Helicopter|スネークヘリ|Tokyo<br>[[Riding Quest]]||{{icons|Wind}}|Blue Sigil|Tail Rotor|Attacks the player by shooting its guns at the player, Firing rockets at the player, using its Rotor as a weapon and charging at the player. After the Rotor charge it take a few seconds to recover from it. Breaking the Tail Rotor will force the helicopter to land which is when it's blue sigil is revealed.}} | ||
| + | |||
| + | {{EnemyRow|blacksnake|[[File:BlackSnakeIcon.png|128px]]|Black Snake|ブラックスネーク|Tokyo<br>[[Riding Quest]]||{{icons|Wind}}|Blue Sigil||Rare version of Snake Helicopter does more damage and has more health.}} | ||
| + | |||
| + | {{EnemyRow|type15tank|[[File:Type-15Tank.png|128px]]|Type-15 Tank|15式戦車|Tokyo<br>[[Riding Quest]]||{{icons|Ice}}{{icons|Wind}}|Blue Sigil|Wheels<br>Gun(not the normal one)|Attack by using the main gun to attack the player. The gun can be one of four things. The normal gun that it used for range, The flame thrower that is used to keep melees away, the Missile launcher that tries to bombard the player, then the missile that if not stopped nukes the area. Besides the first one the other three guns can be broken. If they are stuns the tank. Breaking the road wheels temporarily stuns the enemy.<br><br>if frozen effect happens the top gun is stuck where it was aiming.}} | ||
| + | |||
| + | {{EnemyRow|armoredtype15|[[File:ArmoredType-15.png|128px]]|Armored Type-15|アーマード15式|Tokyo<br>[[Riding Quest]]||{{icons|Ice}}{{icons|Wind}}|Blue Sigil|Wheels<br>Gun(not the normal one)|Rare version of Type-15 Tank does more damage and has more health.}} | ||
| + | |||
| + | {{EnemyRow|trainghidoran|[[File:TrainGhidoran.png|128px]]|Train Ghidoran|トレイン・ギドラン|[[Train Ghidoran Suppression]]<br>[[Free Exploration: Tokyo]]<br>[[Riding Quest]]| | ||
| + | *{{Rarity|13}}{{Icons|Eggs}}[[Wanda]]|{{icons|Wind}}|Blue Sigil|Doors on heads<br>Door on Tail|This boss fights in two phases. | ||
| + | Phase one the bosses attacks are quick and the stop between attacks are short. The attacks it can do are slam the ground (blue car) attack at a distance (yellow car) suck the player in (red car) and slam the ground and shocking it (tail).<br> | ||
| + | When it's low on health it goes into Phase Two where it roars and charges up. | ||
| + | All attacks now do more damage and last longer, but the wait time between them increases as well.<br> | ||
| + | When enough damage is done to the feet the enemy becomes stunned temporarily, but the feet have a higher defense than the body. Also stunned by mirage.}} | ||
| + | |||
| + | {{EnemyRow|doctorghidoran|[[File:DoctorGhidoran.png|128px]]|Doctor Ghidoran|ドクトル・ギドラス|[[Train Ghidoran Suppression]]<br>[[Free Exploration: Tokyo]]<br>[[Riding Quest]]| | ||
| + | *{{Rarity|13}}{{Icons|Eggs}}[[Wanda]]|{{icons|Wind}}|Blue Sigil|Doors on heads<br>Door on Tail|Rare version of Train Ghidoran does more damage and has more health. Stunned by mirage.}} | ||
| + | |||
| + | {{EnemyRow|yamato|[[File:Yamato.png|128px]]|Phantasmal Battleship Yamato|幻創戦艦・大和|[[Unleashed Prestige]]<br>[[Magisterial Onslaught]]<br>[[Quintessence of Steel]]|Lv. 1+ | ||
| + | *{{Props|Toh'oh Soul}} | ||
| + | *{{Props|Yamato Factor}} | ||
| + | Lv. 76+ | ||
| + | *{{Rarity|13}}{{icons|Swords}} [[D-A.I.S Saber]] | ||
| + | *{{Rarity|13}}{{icons|Wired Lance}} [[Seiga Shield]] | ||
| + | *{{Rarity|13}}{{icons|Partizan}} [[Seiga Javelin]] | ||
| + | *{{Rarity|13}}{{icons|Double Saber}} [[Seiga Blade]] | ||
| + | *{{Rarity|13}}{{icons|Knuckles}} [[Quotz Vidya]] | ||
| + | *{{Rarity|13}}{{icons|Knuckles}} [[Phantom Ship Artillery]] | ||
| + | *{{Rarity|13}}{{icons|Gunslash}} [[Mercenary Schwarz]] | ||
| + | *{{Rarity|13}}{{icons|Dual Blades}} [[S.CN Mantis]] | ||
| + | *{{Rarity|13}}{{icons|Assault Rifle}} [[Valkyrie A30]] | ||
| + | *{{Rarity|13}}{{icons|Assault Rifle}} [[D-A.I.S. Vulcan]] | ||
| + | *{{Rarity|13}}{{icons|Launcher}} [[D-A.I.S. Blaster]] | ||
| + | *{{Rarity|13}}{{icons|Twin Machineguns}} [[Phantom Triple Cannon]] | ||
| + | *{{Rarity|13}}{{icons|Bullet Bow}} [[Seiga Archer]] | ||
| + | *{{Rarity|13}}{{icons|Rods}} [[Phantom Radar]] | ||
| + | *{{Rarity|13}}{{icons|Rods}} [[Quotz Laura]] | ||
| + | *{{Rarity|13}}{{Icons|Eggs}} [[Viola]]<br><br> | ||
| + | Magisterial Onslaught<br> | ||
| + | Lv. 76+ | ||
| + | *{{Rarity|7}}{{Icons|Material}} Ether Fuse<br><br> | ||
| + | Holy Echo: Phantasmal Battleship Yamato<br> | ||
| + | Lv. 76+ | ||
| + | *{{Rarity|7}}{{Icons|Material}} Ether Fuse | ||
| + | *{{Rarity|13}}{{icons|Swords}} [[Seikaiser Sword]] | ||
| + | *{{Rarity|13}}{{icons|Wired Lance}} [[Seikaiser Shield]] | ||
| + | *{{Rarity|13}}{{icons|Partizan}} [[Seikaiser Javelin]] | ||
| + | *{{Rarity|13}}{{icons|Twin Daggers}} [[S.CN Arbor Stag]] | ||
| + | *{{Rarity|13}}{{icons|Double Saber}} [[Seikaiser Blade]] | ||
| + | *{{Rarity|13}}{{icons|Knuckles}} [[Glycina Vidya]] | ||
| + | *{{Rarity|13}}{{icons|Gunslash}} [[Mercenary Starlord]] | ||
| + | *{{Rarity|13}}{{icons|Katana}} [[HFB Kamaitachi Letz]] | ||
| + | *{{Rarity|13}}{{icons|Dual Blades}} [[S.CN Arbor Mantis]] | ||
| + | *{{Rarity|13}}{{icons|Assault Rifle}} [[Valkyrie A30S]] | ||
| + | *{{Rarity|13}}{{icons|Launcher}} [[Seikaiser Launcher]] | ||
| + | *{{Rarity|13}}{{icons|Twin Machineguns}} [[Valkyrie R25S]] | ||
| + | *{{Rarity|13}}{{icons|Bullet Bow}} [[Seikaiser Archer]] | ||
| + | *{{Rarity|13}}{{icons|Rods}} [[Glycina Laura]] | ||
| + | *{{Rarity|13}}{{icons|Talis}} [[Glycina Lithos]] | ||
| + | *{{Rarity|13}}{{icons|Wand}} [[Glycina Cane]] | ||
| + | *{{Rarity|13}}{{icons|Jet Boots}} [[Glycina Keyless]]|{{icons|Wind}}|Blue Sigil<br>Blue Beacons<br>Bridge Tower|Large Turrets<br>Medium Turrets<br>Small Turrets<br>Blue Sigils<br>Blue Beacons|Fought in an AIS. <br><br> Main deck is protected by a barrier until the Blue Sigils on the hull sides are destroyed. After they are destroyed, the deck will be accessible and the Blue Beacons will appear.<br> | ||
| + | Once both Blue Beacons are destroyed Yamato will summon a ring of large missiles - the barrier will be restored at this point.<br> | ||
| + | Destroying the missiles will stun Yamato, failing to do so will unleash a large AoE (but you can just respawn after 5 seconds). | ||
| + | Either way, the Bridge Tower will be vulnerable afterwards. | ||
| + | <br><br> Large turrets (46cm triple main battery guns) are vulnerable to Freeze - prevents them from traversing/elevating and firing.}} | ||
| + | |||
| + | {{EnemyRow|gurenzombie|[[File:UIEnemyGurenZombie.png|128px]]|Guren Zombie|グレンゾンビ|[[Unleashed Prestige]]<br>[[Magisterial Onslaught]]<br>[[Solo Training: Bounds of Corruption]]||{{icons|Wind}}|Head||Has higher HP and attack than other Zombie enemies.<br>Attacks have high rate of causing Shock.}} | ||
| + | |||
| + | {{EnemyRow|hagithphemut|[[File:UIEnemyHagithPhemut.png|128px]]|Hagith Phemut|ハギト・フェムト|[[Unleashed Prestige]]<br>[[Magisterial Onslaught]]<br>[[Solo Training: Bounds of Corruption]]||{{icons|Wind}}{{icons|Light}}|||In [[Unleashed Prestige]] or [[Magisterial Onslaught]], Hagith Phemut will appear in three set intervals. He is impervious to damage during the third appearance.<br>Fights primarily with projectiles. Capable of a swift spread shot aimed at players that is repeated twice in succession, as well as firing a triad of slow-moving orbs that inflict Stun when they strike players.<br>May occasionally teleport and enter a pose where he holds his head in his hands, which is followed by him spawning missiles that fly outwards in all directions twice. Hagith Phemut is left vulnerable for a short period after using this attack.}} | ||
| + | |||
|} | |} | ||
Latest revision as of 16:31, 27 October 2022
| Rarity | Icon | Name | Description | Notes |
|---|---|---|---|---|
 |
Jared Dejicai Kenji Sayuda |
A person who weaves the world of Lu Shou, tells the lives of those there & documents their pasts, forever unraveling its future through the mind. One who decided to work on the Visiphone due to its lack of information despite the lack of time they already had. |
Played PSU 360 2yrs, PSO2 8yrs. Edited drop tables on PSUPedia as well. Current PSO2 title count: 1,731. |
working section
Kvaris Dolls
| Enemy | Drop List | Weakness | Breakables | Notes |
|---|---|---|---|---|
| 128px Snow Fuwan スノウフワン |
Weak to:
|
- | A small floating enemy similar to a Dahgash that can fire long ranged attacks. | |
| 128px Snow Tinos スノウティノス |
Weak to:
|
- | A small biped enemy similar to the Dwarf Gekko that consists of a small sphere with two legs attached. | |
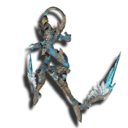
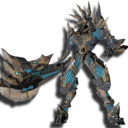
| 128px Zamus Sword |
Weak to:
Weak Point:
|
Breakables:
|
A humanoid DOLL with a bladed arm. Uses its flexible physiology to launch its sword arm, striking enemies from afar. Destroying its chestplate exposes a Chest Core weak point. | |
| 128px Zamus Slash |
Weak to:
Weak Point:
|
Breakables:
|
Destroying its chestplate exposes a Chest Core weak point. | |
| 128px Zamus Gun |
Weak to:
Weak Point:
|
Breakables:
|
A humanoid DOLL with an energy gun for an arm. Destroying its chestplate exposes a Chest Core weak point. | |
| 128px Zamus Launcher |
Weak to:
Weak Point:
|
Breakables:
|
A humanoid DOLL with an energy cannon for an arm. Destroying its chestplate exposes a Chest Core weak point. | |
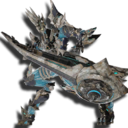
| 128px Volzamus Sword |
Weak to:
Weak Point:
|
Breakables:
|
A humanoid DOLL with a bladed arm. Uses its flexible physiology to launch its sword arm, striking enemies from afar. Destroying its chestplate exposes a Chest Core weak point. | |
| 128px Volzamus Gun |
Weak to:
Weak Point:
|
Breakables:
|
A humanoid DOLL with an energy gun for an arm. Destroying its chestplate exposes a Chest Core weak point. | |
| 128px Jungues |
Weak to:
Weak Point: |
Breakables:
|
||
| 128px Rinshan |
Weak to:
Weak Point: |
Breakables:
|
||
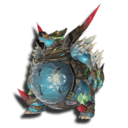
| 128px Snow Roron |
Weak to:
Weak Point:
|
Breakables:
|
||
 Sand Rorox サンドロロクス |
Weak to:
Weak Point:
|
Breakables:
|
||
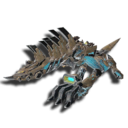
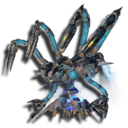
| 128px Fritts |
Weak to:
Weak Point:
|
- | A towering quadruped DOLL similar to a Kartargot which uses its great height to fire beams at its enemies from any distance. Most vulnerable from the back, where its core can be found. | |
| 128px Proctus Ael |
Weak to:
Weak Point: |
Breakables:
|
||
| 128px Proctus Retena |
Weak to:
Weak Point: |
Breakables:
|
||
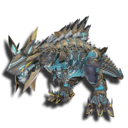
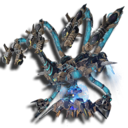
 Sand Nagrus サンドナグルス |
Weak to:
Weak Point:
|
- | A large, quadruped beast-like DOLL that specializes in vicious close-ranged combat. Repeatedly striking it with Wind Techniques causes it get stunned. Initially, it has no weakpoints, but when enraged, it retracts its head and exposes a head core. | |
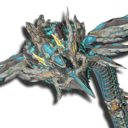
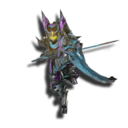 Ikusa Bujin イクサブジン |
Weak to:
Weak Point:
|
- | A mid-sized samurai like DOLL that aggressively attacks one handed using its katana. Unlike most boss DOLLS, Bujins do not have parts to break, but they can be frozen in place, as well as stagger Downed to increase damage to it. | |
 Lysentos リゼントス |
Weak to:
Weak Point:
|
Breakables: | ||
 Kelkund ケルクンド |
Weak to:
Weak Point:
|
- | ||
 Fortes Laser フォートス・レーザー |
Weak to:
Weak Point: |
Breakables: | ||
 Fortes Launcher フォートス・ランチャー |
Weak to:
Weak Point: |
Breakables: | ||
 Lenus Retem レヌス・リテム |
Weak to:
Weak Point: Physical Down Point: |
- | ||
 Lenus Vera レヌス・ヴェラ |
Weak to:
Weak Point: |
- | ||
 Snidael Hammer スナイダル・ハンマー |
Weak to:
Weak Point: Physical Down Point: |
Breakables:
|
||
 Snidael Vera スナイダル・ヴェラ |
Weak to:
Weak Point: Physical Down Point: |
Breakables:
|
working section 2
Las Vegas
| Enemy | Area | Drop List | Breakpoints | Weakness | Notes |
|---|---|---|---|---|---|
 Boxer Phamut ボクサーファムト |
|
??? | Weak to:
Weakspots: |
Melee attacks the player. | |
 Vulture Phamut バルチャファムト |
|
??? | Weak to:
Weakspots:
|
Tries to grab the player if caught every Vulture Phantom will attack the player. | |
 Juggler Pierrot ジャグラーピエロ |
|
Weak to:
Weakspots:
|
Tosses swords at player, gets on a ball and tries to run over the player. | ||
 Chainsaw Pierrot チェーンソーピエロ |
|
Weak to:
Weakspots:
|
Attacks with melee and makes and let go ballons. | ||
 Circus Carriage サーカスキャリッジ |
|
Weak to:
Weakspots:
|
Attack by charging at the player, shooting fire balls in the air, throw rings of fire at the player, sucking the player in so they can be shot far away. | ||
 Brown Bear ブラウンベア |
|
Weak to:
Weakspots:
|
Melee attacks the player and does a special attack that make a bear head pop up and charges at the player. If the player does enough damage to the head during the use the skill stop and the bear fall over making the weakpoint appear. | ||
 Polar Bear ポーラーベア |
|
Weak to:
Weakspots:
|
Melee attacks the player and does a special attack that makes bear arms pop up and shoots a ball of energy at the player. If the player does enough damage to the head during the use the skill stop and the bear fall over making the weakpoint appear. | ||
 T. Rex T・レックス |
|
Tail | Weak to:
Weakspots:
|
Attacks the player with melee attacks and has a skill that makes a T. Rex skull pop out of its chest that shoots a laser beam, during this its weakpoint is exposed. If the player break the Tail it lose a melee attack | |
 Rex Noir レックスノワール |
|
Tail | Weak to:
Weakspots:
|
Rare version of T. Rex does more damage and has more health. | |
 Road Roller ロードローラー |
|
Weak to:
Weakspots:
|
It attacks the player by charging at them. It also can spin its wheel causing gravel to appear hurting anyone near it. It can also flip a big slab of concrete at the player. | ||
 Red Roller レッドローラー |
|
Weak to:
Weakspots:
|
Rare version of Road Roller does more damage and has more health. | ||
 Snake Helicopter スネークヘリ |
|
Tail Rotor | Weak to:
Weakspots:
|
Attacks the player by shooting its guns at the player, Firing rockets at the player, using its Rotor as a weapon and charging at the player. After the Rotor charge it take a few seconds to recover from it. Breaking the Tail Rotor will force the helicopter to land which is when it's blue sigil is revealed. | |
 Black Snake ブラックスネーク |
|
Weak to:
Weakspots:
|
Rare version of Snake Helicopter does more damage and has more health. | ||
 Type-15 Tank 15式戦車 |
|
Wheels Gun(not the normal one) |
Weak to:
Weakspots:
|
Attack by using the main gun to attack the player. The gun can be one of four things. The normal gun that it used for range, The flame thrower that is used to keep melees away, the Missile launcher that tries to bombard the player, then the missile that if not stopped nukes the area. Besides the first one the other three guns can be broken. If they are stuns the tank. Breaking the road wheels temporarily stuns the enemy. if frozen effect happens the top gun is stuck where it was aiming. | |
 Armored Type-15 アーマード15式 |
|
Wheels Gun(not the normal one) |
Weak to:
Weakspots:
|
Rare version of Type-15 Tank does more damage and has more health. | |
 Train Ghidoran トレイン・ギドラン |
Doors on heads Door on Tail |
Weak to:
Weakspots:
|
This boss fights in two phases.
Phase one the bosses attacks are quick and the stop between attacks are short. The attacks it can do are slam the ground (blue car) attack at a distance (yellow car) suck the player in (red car) and slam the ground and shocking it (tail). | ||
 Doctor Ghidoran ドクトル・ギドラス |
Doors on heads Door on Tail |
Weak to:
Weakspots:
|
Rare version of Train Ghidoran does more damage and has more health. Stunned by mirage. | ||
 Phantasmal Battleship Yamato 幻創戦艦・大和 |
Lv. 1+
Lv. 76+
Magisterial Onslaught
Holy Echo: Phantasmal Battleship Yamato |
Large Turrets Medium Turrets Small Turrets Blue Sigils Blue Beacons |
Weak to:
Weakspots:
|
Fought in an AIS. Main deck is protected by a barrier until the Blue Sigils on the hull sides are destroyed. After they are destroyed, the deck will be accessible and the Blue Beacons will appear. Once both Blue Beacons are destroyed Yamato will summon a ring of large missiles - the barrier will be restored at this point. | |
 Guren Zombie グレンゾンビ |
Weak to:
Weakspots:
|
Has higher HP and attack than other Zombie enemies. Attacks have high rate of causing Shock. | |||
 Hagith Phemut ハギト・フェムト |
Weak to:
Weakspots: |
In Unleashed Prestige or Magisterial Onslaught, Hagith Phemut will appear in three set intervals. He is impervious to damage during the third appearance. Fights primarily with projectiles. Capable of a swift spread shot aimed at players that is repeated twice in succession, as well as firing a triad of slow-moving orbs that inflict Stun when they strike players. May occasionally teleport and enter a pose where he holds his head in his hands, which is followed by him spawning missiles that fly outwards in all directions twice. Hagith Phemut is left vulnerable for a short period after using this attack. |